2 Lab 2: Osmosis and Diffusion
General Information
Lab 2 has students explore diffusion, osmosis, tonicity, and semi-permeable membranes. This lab includes students making their own “cell” using dialysis tubing.
NOTE — This lab is tied for the most prep required.
Purchasing Information
Required materials for Lab 2 include:
- 250 mL beakers — 5 beakers for every 2 students
- A kettle and access to ice
- A plastic bin for the ice bath
- A 1 L beaker for the cold water
- Liquid food colouring — 1 bottle for every 2 students
- Do not get the gel kind, as it does not diffuse. You may want to check your food colouring ahead of time to make sure it diffuses nicely
- Small electronic scales — 1 for every 4 students. If you search for “pocket scale” lots of good options will come up
- Cutting boards with small paring knives – 1 for every 4 students
- Erlenmeyer flasks — For preparing the starch, glucose and saline solutions
- The size will depend on your class size.
- E.g., 3L Erlenmeyer flasks for the two saline solutions and 1L Erlenmeyer flasks for the glucose and starch solutions
- 6 1L beakers — For saline, glucose, and starch solutions that students to pour from
- Several small weight boats
- Plastic shot glasses from the dollar store work too.
- 2 glass bottles and droppers — For the IKI
- Brown glass works best for IKI due to its photosensitivity (see Additional Notes for more information).
- Dental floss — 1 container for every 4 students
- Test tube tongs
- Clear plastic rulers
- Dialysis tubing — About 8 inches for every 2 students
- The recommended size is 20.4 mm x 32 mm, but a bit bigger or smaller should still work fine.
- Can buy in 50 ft lengths
- A glass bowl — For soaking the dialysis tubing
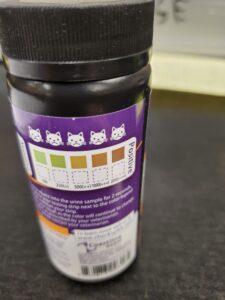
- Glucose test strips
- Sometimes it is cheaper to buy pet urine testing strips than human medical-grade glucose strips. These strips may look like the Figure 2.1 below.

Lab Setup
Preparations
Time: Approx. 1 hour (to make solutions)
Tasks:
- Buy potatoes — 1 medium potato for every 4 students
- Make glucose, starch, and saline solutions
Activity 2 Solutions
Solution 1: 0.9% saline
- Prepare 1.5 L for 20 students.
- Mix 9 g NaCl for each 1 L water.
- Dissolve well.
Solution 2: 3% saline
- Prepare 1.5 L for 20 students.
- Mix 30 g NaCl for each 1 L water.
- Dissolve well.
NOTE — These solutions need to be precise for students to get good results for this activity.
Activity 3 Solutions
Solution 1: 5% glucose
- Prepare 400 mL for 20 students.
- Mix 5 g glucose for each 100 mL water.
- Dissolve well.
Solution 2: 1% starch
- Prepare 500 mL for 20 students.
- Mix 1 g starch for each 100 mL water.
- Dissolve well.
Pro-Tip — Use cellulose packing peanuts for Solution 2.
- Dissolve a handful in 500 mL of warm water with a stirring rod.
- This way is easier than using lab-grade starch powder, which clumps up very easily.
NOTE — These solutions do not need to be precise for students to get good results.
Lab Activity Setup
Time: Approx. 1.5 hours
Board Notes
Welcome to Lab 2: Safety and the Microscope
- Please hand in:
- Post Lab 1
- Pre Lab 2
- Please re-use your beakers – limit 4 beakers per pair
- Order of Activities (if you want to get the whole lab done and/or leave on time)
- Activity 1 — Start and finish
- Activity 2 — Start and set a 1 hour timer
- Activity 3 — Start and set a ½ hour timer
- Activity 3 — Collect results
- Activity 2 — Collect results
- Cleanup notes:
- Saline solutions can go down the sink
- Beaker with IKI given to instructor for disposal
- Potatoes and “cell” can be composted
- Beakers washed and placed to dry
- Lab benches wiped down and hands washed
Setup Photos
Figure 2.2: Lab 2 Activity 1 (Credit: Christine Miller) CC BY-NC-SA 4.0 license
Figure 2.3: Lab 2 Activity 2 (Credit: Christine Miller) CC BY-NC-SA 4.0 license
Figure 2.4: Lab 2 Activity 3 (Credit: Christine Miller) CC BY-NC-SA 4.0 license
Bin Lab
Figure 2.5: Lab 2 Bin (Open) (Credit: Christine Miller) CC BY-NC-SA 4.0 license
Figure 2.6: Lab 2 Bin (Closed) (Credit: Christine Miller) CC BY-NC-SA 4.0 license
Additional Notes
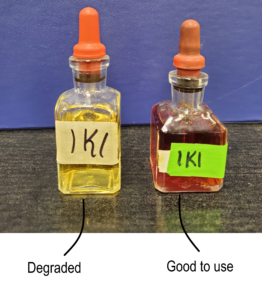
IKI is photosensitive and can degrade if exposed to too much light. Degradation causes a change in colour, like in Figure 2.7 below.

Media Attributions
- Figures 2.1 to 2.7, by the author, are under a CC BY-NC-SA 4.0 license.

