1 Lab 1: The Microscope
General Information
Lab 1 helps students become familiar with the compound light microscope and its use. Students are guided through a series of exercises showing them:
- What parts make up a microscope.
- How to set a comfortable ocular width.
- How to put a slide on the stage.
- How to navigate around a slide.
- How to move from scanning power to low power to high power.
Students will also learn how to make a wet mount slide and explore the inverse relationship between magnification and field of view/depth of field.
Purchasing Information
- A class set of compound microscopes — preferably with 4x, 10x, and 40x objective lenses
- A class set of the following slides and slide materials:
- Coloured threads slides
- Available from many places, including Amazon, Ward’s Science, and Boreal Science
- Blank slides
- 1 class set is recommended in case of breakage
- Available from lots of places
- Do not buy plastic ones, as they scratch and bend easily
- Coverslips
- Buy lots as they are disposable, and each student needs 2 per lab.
- Do not buy plastic ones as they scratch and bend easily.
- A set of random slides with neat samples on them
- E.g., slides with 4 items per slide that are themed: textiles, insect parts, tiny plants, animals, etc.
- Some sets are available on the following website: Prepared Slides Bundle: Set I & II (Learning Resources, n.d.).
- Coloured threads slides
- Small scissors (like sewing or kids scissors) — 1 pair for every 4 students
- Forceps (or tweezers) — 1 pair for every 4 students
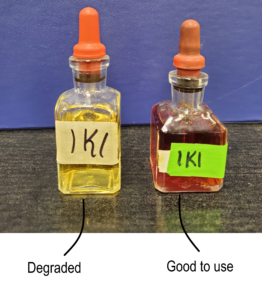
- Small glass bottles with droppers — 1 for water and 1 for IKI
- Brown glass works best for IKI due to its photosensitivity (see Additional Notes for more information).
- Cutting boards with small paring knives – 1 for every 8 students
- Clear plastic rulers — 1 for every 4 students
- Printed lab labels — laminating them is optional
- Newsprint with small font
- (On lab day) Onion — 1 medium-sized onion is enough for a lab with 20 students, where each makes their own slide.
Lab Setup
Preparations
- Buy an onion.
Lab Activity Setup
Time: Approx. 1 hour
Board Notes
- Please hand in:
- Signed safety contract from page 7 of your lab manual
- Pre-Lab 1 Assignment from page 11 of your lab manual
- Find a partner to work with (you each get your own microscope)
- If you get stuck, first ask your partner, then ask the teacher
- Remember to call your teacher over when you reach a symbol
- Cleanup:
- Slides – get cleaned and returned
- Coverslips – go into the sharps disposal container
- Microscopes back where you got them
- Wipe down your lab bench and wash your hands before you leave
Setup Photos
Bin Lab
Troubleshooting Microscopes
Why can I not see anything?
Check that:
- The microscope is plugged in and turned on.
- The slide is in the field of view.
- The objective lens is clicked into place.
- The iris diaphragm is set properly.
- The blue filter is working properly.
- Only one eye is used to view (like a pirate).
- The depth of field is not decreased to the point that the item cannot be focused on.
Why do I lose my image when I move up in magnification?
- The image is centered in the field of view and very well-focused before increasing magnification.
- The objective lens is in properly and clean.
- The iris diaphragm is set properly.
Why will my course focus not work / why does my microscope keep going out of focus?
Focus tension:
- Cannot move the course focus – the tension is too tight.
- The microscope falls out of focus spontaneously – the tension is too loose.
Additional Notes

Media Attributions
- Figures 1.1 to 1.6, by the author, are under a CC BY-NC-SA 4.0 license.
References
Learning Resources. (n.d.). Prepared slides bundle: Set i & ii. https://www.learningresources.com/item-prepared-slides-bundle-set-i-ii.

